As a network manager of a Pressbooks network, you have access to tools that allow you to control book creation, deactivate or delete books, publish or unpublish books, add or remove books to/from your network catalogue, and search and filter the books which have been created on your network.
Create New Books
New books can be created by network managers or by regular users, depending on the settings you’ve chosen for the network. For more information on book registration network settings, see the Configure Network Options chapter of this guide. Here, we’ll cover how to register a book at the network level. To add a new book to you network you can use the standard ‘Create a Book’ feature or the ‘Add New Book’ menu only available to network managers.
1. Access the Network Admin dashboard, then navigate to Books > Add New from the left sidebar menu. You will be brought to the Add New Book form.
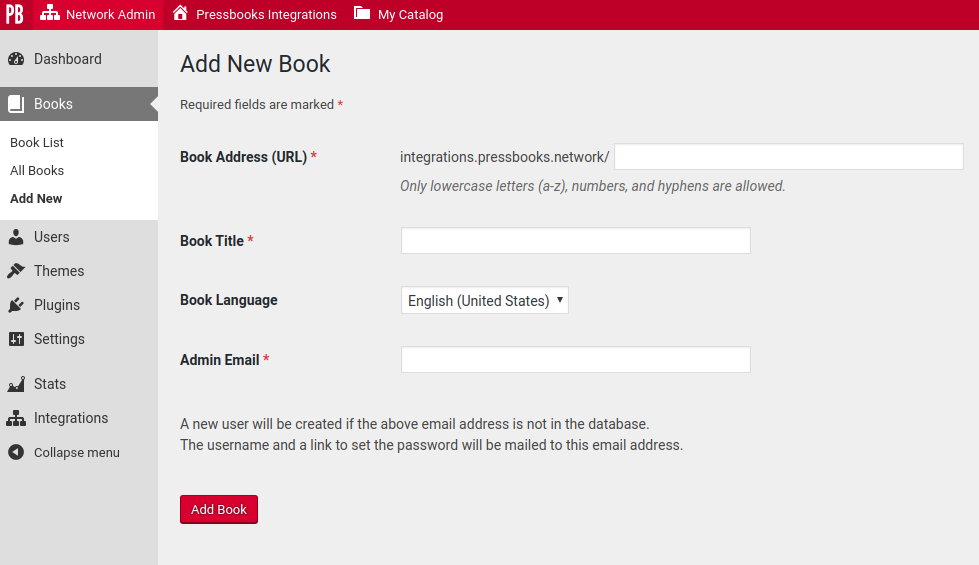
2. Enter the URL you’d like the book to have on your network in the Book Address (URL) field – this will be the permanent link to the new book
3. Enter the title of the book in the Book Title field
4. Select the language the book will be written in from the Book Language drop-down menu.
5. Add the email of the administrator for the book in the Admin Email field. If the email address belongs to an existing user on the network, the book will appear in their catalog once registration is complete. If the email address doesn’t belong to an existing account, a new user account will be created on the network, and the individual will receive an email to confirm their registration.
6. Click Add Book. After the command is processed, you will be brought to the dashboard of your new book.
Use the Book List
Pressbooks networks have a Book List menu, which provides you with a filterable, sortable list of all books on your network. Network managers can use this menu to administer the books on your network, as well as sort and filter books by license, subject, and more. To find the Book List, access your Network Admin dashboard, then click Books > Book List.
The first thing you’ll see is a statement of the total number of books on your network and how much storage space they’ve taken up. You’ll also see the timestamp for when the information in the table was last updated.
Beneath that, you’ll find a set of filters and a dynamic table displaying all the books on your network. For each book, you’ll see the following columns:
- Cover
- Book title
- Last edited date
- Created date
- Word Count
- Number of authors (total # of users with a contributor or greater role)
- Number of readers (total # of users with the subscriber role)
- Book Admins (email addresses of users with the administrator role in that book)
- Storage size
- Language
- Subject
- Theme
- License
- Global privacy status
- In catalog status
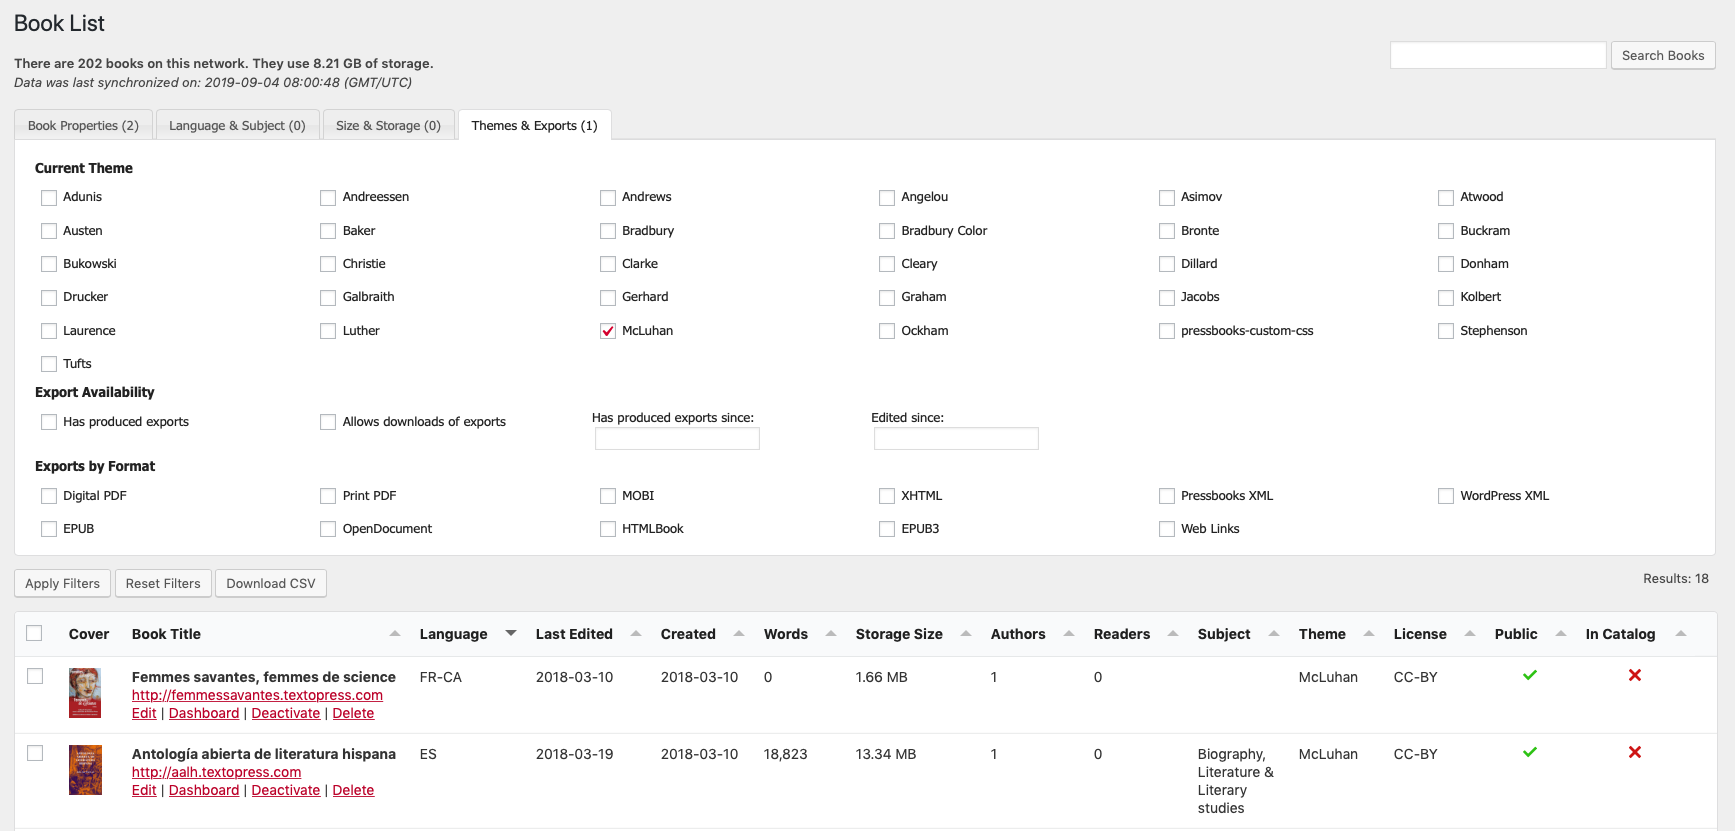
Each of the columns in the book list is sortable. To sort by a specific column, click that column’s title. The direction of the arrow next to the title shows the direction the results will be sorted. Click the column title a second time to reverse the sort order for a given column.
You can resize column width by clicking and dragging the ends of the column header. To increase or decrease the width of a column, hover your cursor between that column and the next. A left-right arrow will appear. Click and drag this arrow to resize the column as desired. You can also reorder columns by clicking and dragging their headings into a different position. Columns should be ‘sticky’ once moved. (NOTE: This behavior may be affected by your browser settings.)
Depending on column width and screen size, you may need to scroll left or right to see all the information available in the table. You can also choose to see fewer or more results by picking your page size. By default, the table will show 25 results at a time, and allow you to click through to subsequent pages of your results. However, you can also set the table to show 10, 50, or 100 results at a time using the “Page Size” drown down at the bottom of the display table.
Deactivate a Book
Deactivating a book removes it from public and private access (and user catalogs) while keeping it on your network. Once a book has been deactivated, no visitors will be able to view the webbook, and no users on your network will be able to edit the book. Network managers can continue to view, edit, and reactivate the book, however. Deactivated books will be highlighted in red in your booklist and their URLs will be reserved (meaning they cannot be used by another book on your network).
To deactivate a book:
- Click the ‘Deactivate‘ link

- When you click the link, you’ll be brought to a new page and asked to confirm your action. Click Confirm to complete the deactivation.

- When you return to the Book List, the book will now display highlighted in red to show that it has been deactivated.

- If the user attempts to visit a deactivated book, they will see a “This site is no longer available.” message

Reactivate a Deactived Book
If a book has been deactivated or deleted by a user, network managers can reactivate the book and make it available to be edited or read once again. To reactivate a user-deleted or administrator-deactivated book:
- Click Network Admin > Book List and find a deactivated book you’d like to restore

- Click Activate
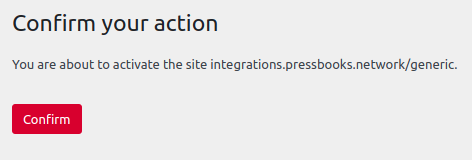
- Confirm your action on the next page
Delete a Book
Deleting a book permanently removes a book from your network and frees up its URL to be used by another book on your network. Deletion of books by network managers is final: books which you delete cannot be retrieved! To delete a book:
- Click the ‘Delete‘ link

- When you click the link, you’ll be brought to a new page and asked to confirm your action. Click Confirm to complete the deactivation.

- When you return to the book list, this book will no longer appear because it has been permanently deleted from your network.
Publish and Unpublish Books
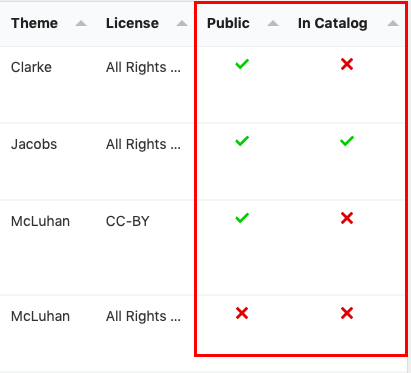 As a network manager, you can instantly toggle the Global Privacy status and In Catalog status for books on your network by clicking the relevant value in the ‘Public’ and ‘In Catalog’ columns. Learn more about how users can modify their books’ Global Privacy Status.
The X symbol represents private books in the Public column and non-cataloged books in the In Catalog column. The √ symbol represents public books in the Public column and cataloged books in the In Catalog column. To publish a book, click the X in the Public column of a private book to change the symbol to a √. To add a book to your network catalog, Click the X symbol in the In Catalog column. Doing so will publish the book (if it is not already public) and change the In Catalog symbol to a √.
To make a previously published book private, click the click the √ symbol in the Public column to change the symbol to a X. Unpublishing a book will also remove it from your network catalog, if it was listed there. To remove a public book from your catalog without unpublishing it, simply click the the √ symbol in the In Catalog column to change it to a X.
Administer Books in Bulk
As a network manager, you can also perform delete, publish/unpublish, and add/remove from the catalog actions for multiple books at once. To perform a bulk action:
- Select the checkbox for each book you want the action applied to
- Open the Bulk Actions dropdown menu at the bottom of the book list
- Select the Action you’d like to perform
- Click Apply
The action will be applied to every book selected.
You can select all books on a page by selecting the checkbox in the title row. Note that this only selects the books on the page you’re seeing. If your network has 274 books and your page size is set to 25, using the Select All option only selects the first 25. You can use the ‘page size’ setting to change how many books display on a single page of the book list.
Filter the Book List
You can search or filter the book list display to view subsets of books on your network that satisfy various criteria. You can choose to apply multiple filters from different tabs simultaneously. Filters are cumulative across tabs, meaning that if you add a filter in one tab and then switch to another tab, the list will still apply the filters from both tabs. Results must meet the criteria of all unique filters in order to appear, though you may be able to choose a larger range of options within a filter. You’ll see the number of active filters on a tab next to the tab’s title.
When you’ve selected the filters you want, click Apply Filters to display the results. To start over, select the Reset Filters button.
Book Properties Filters
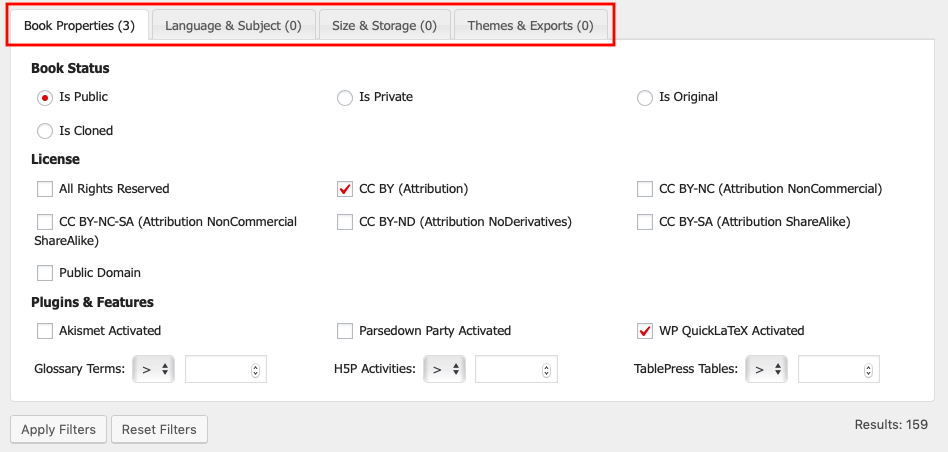
Book Status
This filter allows you to choose from four options:
- Is public
- Is private
- Is original
- Is cloned
The first two pertain to a book’s global privacy setting. The second two are determined by if a book was cloned and adopted from another Pressbooks book or not. You can only choose “Is public” or “Is private” because a book cannot be both. If neither is chosen, all books on the network will display.
Similarly, you can only choose “Is original” or “Is cloned” because a book cannot be both. If neither is chosen, all books on the network will display. You can, however, choose an option from both the first set and from the second set.
License
Select the licenses you want to filter by. This tool can be convenient if you need to know how many openly licensed texts you currently host on your network, or need to specifically find texts which allow derivatives.
Plugins & Features
Filter by the following features and plugins on Pressbooks:
- Akismet
- Parsedown Party
- QuickLaTeX
- Glossary
- H5P
- TablePress
The Glossary, H5P, and TablePress filters allow you to filter books by a certain quantity. For example, if you wanted to know how many books on your network contained more than 20 H5P activities, you could input: ‘H5P Activities > 20‘ and then click ‘Apply Filters‘. Only books with at least 20 H5P activities will display in the resulting list.
Language & Subject Filters
Filter by the language and subject that have been determined in a book’s metadata. Only languages and subjects which appear in at least one book on the network will appear. Choose more than one language and subject at a time; the table will show all results which include any of the languages or subjects you’ve chosen.

Language
Pressbooks currently offers 140 metadata languages, including several national or regional variants of specific languages. Only languages which appear in at least one book on your network will appear in the filter list. If more than one language is selected as a filter, the table will show all books which include any of the languages you’ve chosen.
Subject
Filter by the subject of books on your network. Book administrators can select a subject for their book from the Thema subject category scheme for global book trade. Thema offers thousands of subjects to choose from. Only the top-level subjects which appear in at least one book on the network will appear in the tab.
Size & Storage Filters
Filter results by the following criteria:
- Word Count
- Book Storage

You can enter the amount you want to use as the standard of your search, then choose to see results that are more than (>) or less than (<) that number. For example, if you only wanted to see books which were less than 40,000 words but which took up at least 250MB, your search would look like:
Word Count < 40000
Book Storage > 250 MB
Select Apply Filters. The table will show only those books which meet those two criteria.
Themes & Exports Filters
Filter results by what type of formats are being created and how recently a book has seen export activity.
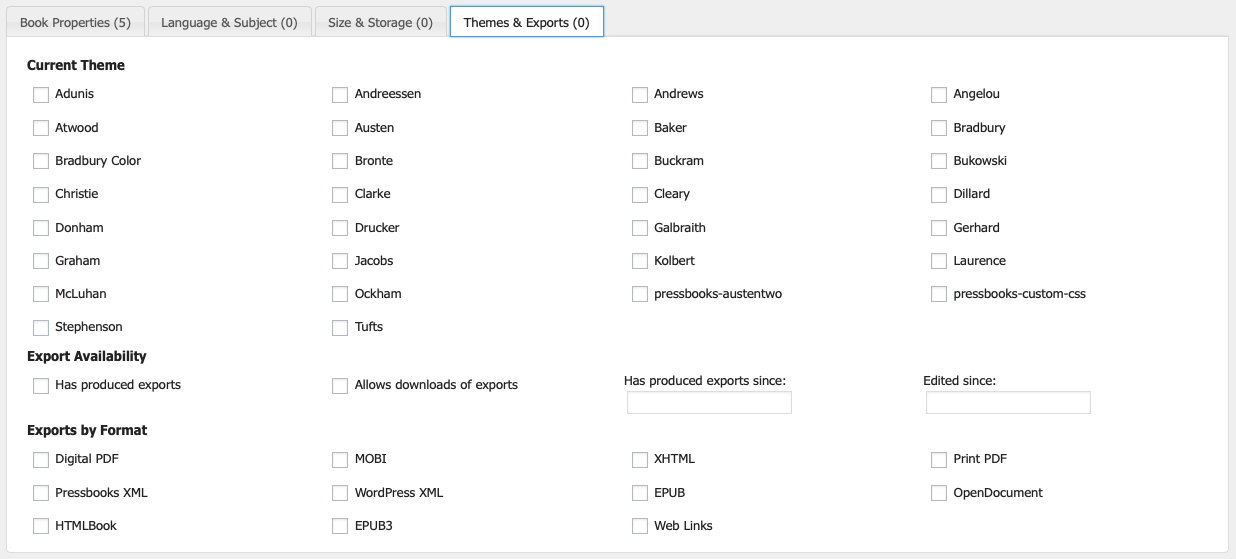
Current Theme
Filter by theme to see only books which currently have that theme applied. Only themes which are active on at least one book on the network will appear as an option. Choose multiple themes at once to see all books which have any of those themes applied.
Export Availability
Filter the book list by the following criteria:
- Has produced exports
- Allows downloads of exports
- Has produced exports since [date]
- Edited since [date]
This feature can be convenient if you want to know which books on your network have been updated within a certain time frame. As an example, if you needed to find out which books that allow free public downloads of exports have been edited in the last semester, your search may look like
[√] Has produced exports
[√] Allows downloads of exports
Edited since: 2019-01-01
You could then check those books to see if they need new files exported.
Exports by Format
Pressbooks produces exports for roughly a dozen different file formats, not including the digital webbook format. You can filter all book on the network by which ones have had specific file formats exported.
This can be helpful, for example, if you need to know which or what quantity of the books on your network have been available in PDF format. These results can also be limited to a specific time frame using the filters in the Export Availability section. If you wanted to know how many books on your network had exported print PDF files in the last six months, your search may look like:
[√] Print PDF
Has produced exports since: 2019-01-01
Download Book Lists as CSV Files
You can download a CSV file of your book list (with or without filters applied) to your computer to be viewed and sorted. To do so, apply your desired filters and click the Download CSV button beneath the filter panel.
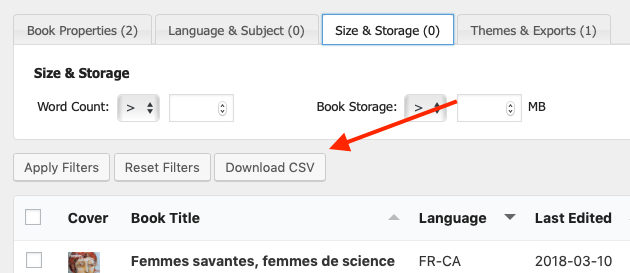
NOTE: To make sure that the results viewed in your book list match the results downloaded in your CSV file, be sure to click Apply Filters before you click Download CSV.

